
Note: This is the second half of a two-part introduction to backing up your computer. Last week’s post explained why this is so important and what you should look for in buying a backup hard drive.

As Socrates once said, getting started is the hardest part of a big project. Well, maybe that was my dad who said that when I procrastinated on the gigantic research paper in 12th grade English.
Well the same thing is true in computer backups! And it’s actually a lot better than a gigantic research paper: once you set up your backups, all you have to do is plug in your hard drive every so often. Everything else is automatic! How easy is that?
You need an external hard drive (we covered that last week). You need backup software (it came with your computer, ready to go!) And you need to know how to set it up the first time (we’ll cover that here).
We’re going to start with Windows 8 computers. If you have Windows 7, click here to skip ahead to that section. If you’re on a Mac, click here. (If your computer has Windows XP, you’ve got bigger problems, but you can click here to read about XP’s backup software.)
Windows 8
Windows 8 calls its backup software File History, and it’s the best backup software yet for Windows. Here’s how to use it:

Click “Control Panel” on the start screen, then scroll to the bottom of the list and select “More settings.” In the Control Panel window that appears, click “System and Security,” then look for “File History” at the bottom of the list. (Come on Microsoft, this is harder to find than it should be!)
Now you’re in File History, and you’re almost done. Once you plug in your external hard drive, you’ll see a button labeled “Turn on.” Click it, and you’ve set up your backups!
Windows 7 uses a program called Backup and Restore. It’s a big improvement over what came with previous versions of Windows. Here’s how to get started:
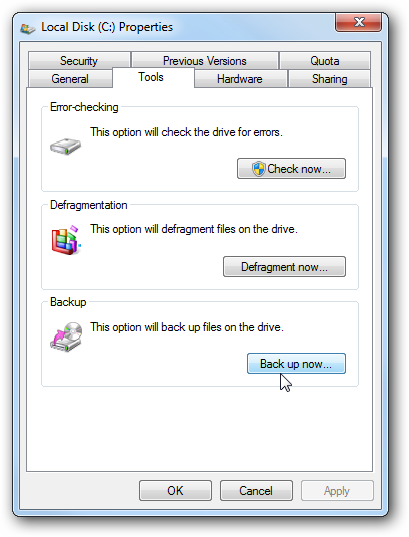
Open “Computer” from the Start menu, right-click on your Local Disk, and select “Properties.” Click the “Tools” tab, and then the “Back up now…” button. Click “Set up backup.”
You’ll see your external drive in the list, and it should be labelled Recommended. Select it and click Next. In the next window, have Windows choose what to back up (again, it’s the Recommended setting.)
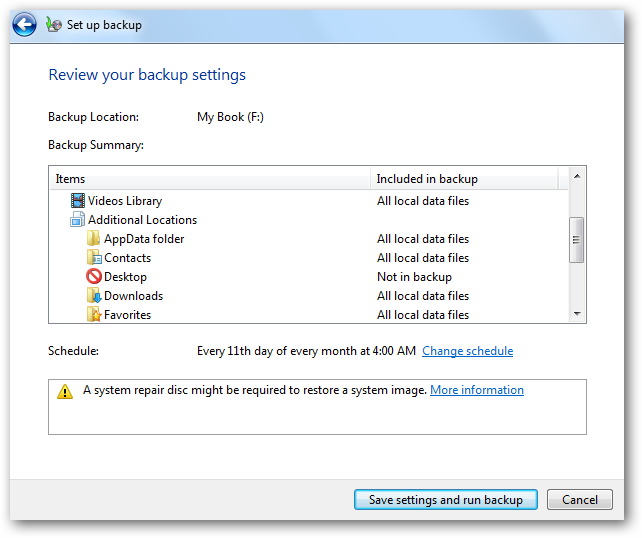
You’ll notice in the next window that Windows has set a schedule for when to back up your hard drive. Change it if you want (I’d change it to at least once a week), then click “Save settings and run backup.” Ta-da! You’ve started your first backup. Congratulations!
Macs use Time Machine. Very easy to set up, and makes it almost fun to go recover an accidentally deleted file. Here’s how to set up Time Machine:

Click the Time Machine icon in the top menu bar (looks like an analog clock face), and click “Open Time Machine Preferences…)
First, hit the big switch on the left side of the window to turn Time Machine from OFF to ON. Once you plug in your external drive, you’ll click “Select Disk.” You’ll see a drop-down menu of available disks. Choose yours, click “Use disk,” and Time Machine will run your first backup in a couple minutes!
Wrapping up:
One important thing to keep in mind after you finish setting things up: Windows 8 and Mac computers will run a backup every hour when the external drive is plugged in. Windows 7 runs a backup once a month by default, and if you don’t have your drive plugged in, then you miss that month’s backup.
The easiest thing to do is just leave the hard drive plugged into your computer all the time. That’s better than having no backup! But keep in mind what I said last week about the importance of offsite backups.
I promise getting started is the hardest part! Hopefully these steps will make that process easier for you. If you felt this was helpful to you, please pass it along to someone else who might need help!
As always, if you have any questions or a topic you want help with, send it to me with the form below. I can’t wait to hear from you!


Both are remembered as wise!
LikeLike