Microsoft has traditionally sold operating systems for a hefty price…currently a full upgrade to Windows 8.1 costs around $100. This meant that most people don’t upgrade to the newest operating system until they buy a brand-new computer. But Microsoft seems to be trying to change that.
Microsoft last month announced the upcoming release of their newest operating system, Windows 10. (Yes, their previous OS was Windows 8. They skipped Windows 9 apparently.)
Along with announcing the new features of Windows 10, Microsoft also announced that Windows 10 will be a free upgrade for users of Windows 7 and Windows 8.1 within the first year after Windows 10 is released.
So if you’re using Windows 7, don’t fork over your money to pay for an upgrade to Windows 8.1. Wait a bit longer and get a free upgrade to the newest version — Windows 10.
Microsoft hasn’t officially announced a release date for Windows 10, but it’s rumored to be a summertime release in 2015, and that makes sense so they could have Windows 10 installed on new computers in time for back-to-school shopping.
So it seems the one-year window (see what I did there?) for getting your free upgrade won’t start for at least several months. This means if you buy a new PC before then, it will most likely have Windows 8 installed, but you’ll soon be able to upgrade to Windows 10 for free.
Also, if your computer is pre-Windows 7 (XP or Vista), you can feel free to buy a new Windows 7 or 8 computer and will soon be able to get the newer Windows 10 upgrade for free.
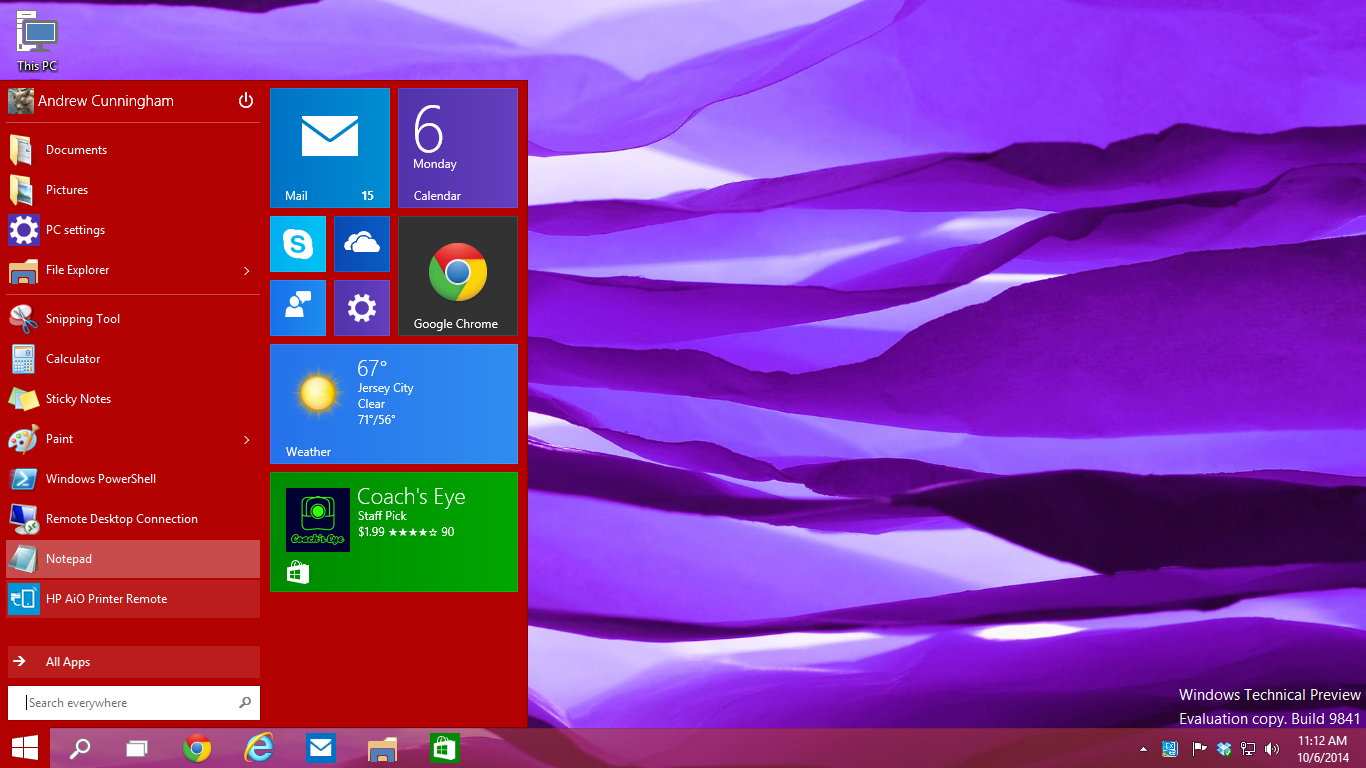
Windows 10 desktop and Start Menu (Photo courtesy of arstechnica.com and Andrew Cunningham)
Some of Windows 10’s new features will include automatically installed updates, a new web browser to replace Internet Explorer, and Cortana (Microsoft’s version of Siri). And the Start Menu seems to be returning to its more traditional form after being changed for Windows 8.
Got a topic you want me to blog about? A comment or suggestion? Let me know below!
Douglas Engelbart with his newly invented mouse in 1968. Check out how big it is! (Photo courtesy of The New York Times)
Using a computer would not be nearly as easy as it is today without Douglas Engelbert’s most famous invention: the mouse.
We take for granted today how much more intuitive computers are because of the mouse. It was a remarkable invention.
Nevertheless, for certain tasks it’s still quicker to just use a keyboard, thanks to keyboard shortcuts.
Below I’ve compiled a list of the most common and helpful keyboard shortcuts for Windows. Feel free to print out this list, or copy it to a document on your computer for easy access. Once you start using the shortcuts more often, you’ll begin to memorize them, and that’s when you’ll really start to be able to work more quickly.
The Windows logo key is circled in red.
By the way, “Windows logo key” refers to the key pictured to the right. Unless otherwise noted, press all keys in the combination at the same time.
Note: This list applies to Windows 8. Most of the shortcuts apply to previous versions as well, but if you use Windows 7 you may appreciate this list specifically for your version.
Common commands
F1 —–> Show Help menu
Ctrl + X —–> Cut the selected item
Ctrl + C —–> Copy the selected item
Ctrl + V —–> Paste the selected item
Ctrl + Z —–> Undo an action
Ctrl + Y —–> Redo an action
Alt + Tab —–> Switch between open apps
Alt + F4 —–> Close the current item or page
Windows logo key + D —–> Show the desktop
Windows logo key —–> Show/hide the start screen
Working with files
Windows logo key, then start typing —–> search your computer
F3 —–> Search for a file or folder
Ctrl + A —–> Select all items (or all text if in a document)
F2 —–> Rename selected item
Click an item, then hold Shift and click another item —–> Select all items in between the two you clicked
Click an item, then hold Ctrl and click other items —–> Select all items clicked
Give some of these a try, and I bet you’ll find you can save some time on the computer. If this list whets your appetite for keyboard shortcuts, check out Microsoft’s full list. Mac users: don’t fret; your list is coming next week.
UPDATE: A reader let me know that F11 will take an Internet browser fullscreen without having to find the little “Maximize” button in the corner. Handy!
Do you have any favorite shortcuts I’ve missed? Let me know below.
Aaaaaand in this corner… (Photo courtesy of apsotech.blogspot.com)
A reader writes in: “At my school, they promote Mac laptops over PC’s. What are the difference between Mac’s and PC’s? Is one better than the other? Thanks!”
When I was looking at different options for universities, I noticed one of my top choices required journalism majors to have a Mac. I’d only used Windows PCs before[1]. So I started researching. I ended up going to a different school, but I did buy a Mac for college.
That computer lasted me 5 years, and when it died I bought another Mac. I know there are a lot of people who are fanatical about one system or the other. I have experience with both Macs and PCs, and I’ll give you as unbiased of info as I can.
First though, check out this Apple ad from 2006:
I think it’s a good laugh (apologies to any of you who have recounted your vacations with a pie chart). In reality though, Macs and PCs are much more similar than this ad implies (and PCs do a lot more than spreadsheets!) There are differences, however, and here are the main ones I see between the two:
Advantages of Macs:
-Apple makes both the hardware and software for Macs. In contrast, Microsoft makes the the software (Windows) for PCs, while other companies make the hardware (Acer, Dell, HP, etc.)[2]. If you buy an HP laptop, it will often have some HP software installed on it, plus trial versions of software like anti-virus. By contrast, all software that comes with a Mac is made by Apple, so no extra, hidden software eating up your computer’s performance.
-Likewise, Macs do come with apps like iPhoto and iMovie, which can be very helpful for organizing your photos and creating home movies.
–The vast majority of viruses and malware are created to target Windows computers[3]. These problems are so rare on Macs that many people say Mac owners don’t even need antivirus software. (Of course, you should always use good judgment when clicking on websites and downloading files, regardless of your operating system.)
–The parental controls options and backup software included on Macs are much easier to access and use than on PCs (although Windows 8 has made backup simpler).
–Apple has better support, both online and in-person at their Apple Stores. In addition, when Apple updates their operating system, Mac users get to download it for free. On the PC side, you still have to pay to upgrade to new Windows versions (unless you buy a new PC).
Advantages of PCs:
–PCs have many more options available. In addition to many different hardware manufacturers to choose among, each of those manufacturers often offer more choices than Apple does with it’s PCs. The choices include color, design, size, and many internal choices, too.
–PCs are much more upgradeable (is that a word?). Macs are becoming less able to be upgraded without taking them in to an Apple store. By contrast, a PC user could replace almost any internal hardware from home.
-Here is the most obvious difference to most people: PCs are almost always less expensive. The cheapest Mac laptop currently costs about $900 regularly, while comparable PCs run about $700. And there are options among PCs even cheaper than that.
Conclusions:
-If your work or school requires a certain operating system, don’t look to me for help!
-If you want specific customization options or want to build a computer for a specific purpose (like computer games), definitely go with a Windows PC.
-If you are interested in trying things like editing photos or videos, or recording music, look for a Mac, which has great apps for those things built-in.
-For the average person, I believe a Mac will give you the best overall experience, due to its simplicity, dependability, and support after the purchase. It’s also similar enough to a PC that switching is not usually a difficult process.
-For a person who expects to only write emails and documents, check social media, etc., a PC is a fine choice. The price difference between a low-end PC and a low-end Mac is big, and both will handle those basic tasks just fine.
Neither option is right or wrong…just a better option for your particular situation. I hope I’ve made things clearer for you. Let me know if you have any questions about this.
Plus, fill out the form below and your question could be the topic next week! I’d love to hear from you.
1 – PC stands for “Personal Computer.” Technically, a Mac is a personal computer, but PC has come to refer only to computers running the Windows operating system. So that’s how I’ll use PC in this blog post.
2 – Laptops running a Google operating system (known as Chromebooks) have been on the market for a couple years. Google’s OS is specifically designed to be connected to the Internet almost all the time.
3 – This is due to a combination of the more secure way Macs’ operating system is designed and the fact that 90% of computer users use Windows.
Note: This is the second half of a two-part introduction to backing up your computer. Last week’s post explained why this is so important and what you should look for in buying a backup hard drive.
Socrates would’ve been wise enough to back up his computer (Photo courtesy of wikipedia.com)
As Socrates once said, getting started is the hardest part of a big project. Well, maybe that was my dad who said that when I procrastinated on the gigantic research paper in 12th grade English.
Well the same thing is true in computer backups! And it’s actually a lot better than a gigantic research paper: once you set up your backups, all you have to do is plug in your hard drive every so often. Everything else is automatic! How easy is that?
You need an external hard drive (we covered that last week). You need backup software (it came with your computer, ready to go!) And you need to know how to set it up the first time (we’ll cover that here).
We’re going to start with Windows 8 computers. If you have Windows 7, click here to skip ahead to that section. If you’re on a Mac, click here. (If your computer has Windows XP, you’ve got bigger problems, but you can click here to read about XP’s backup software.)
Windows 8
Windows 8 calls its backup software File History, and it’s the best backup software yet for Windows. Here’s how to use it:
File History page in Windows 8 (Photo courtesy of howtogeek.com)
Click “Control Panel” on the start screen, then scroll to the bottom of the list and select “More settings.” In the Control Panel window that appears, click “System and Security,” then look for “File History” at the bottom of the list. (Come on Microsoft, this is harder to find than it should be!)
Now you’re in File History, and you’re almost done. Once you plug in your external hard drive, you’ll see a button labeled “Turn on.” Click it, and you’ve set up your backups!
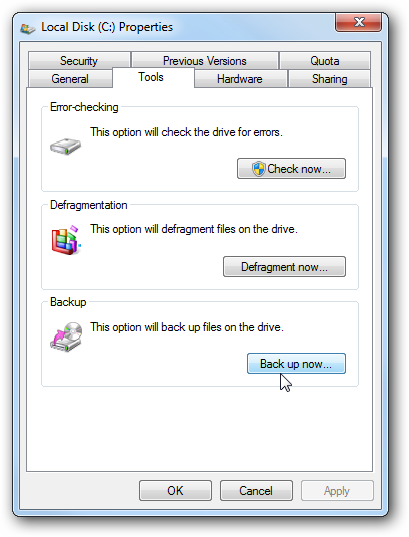
The Tools tab in Windows 7 (Photo courtesy of howtogeek.com)
Windows 7
Windows 7 uses a program called Backup and Restore. It’s a big improvement over what came with previous versions of Windows. Here’s how to get started:
Open “Computer” from the Start menu, right-click on your Local Disk, and select “Properties.” Click the “Tools” tab, and then the “Back up now…” button. Click “Set up backup.”
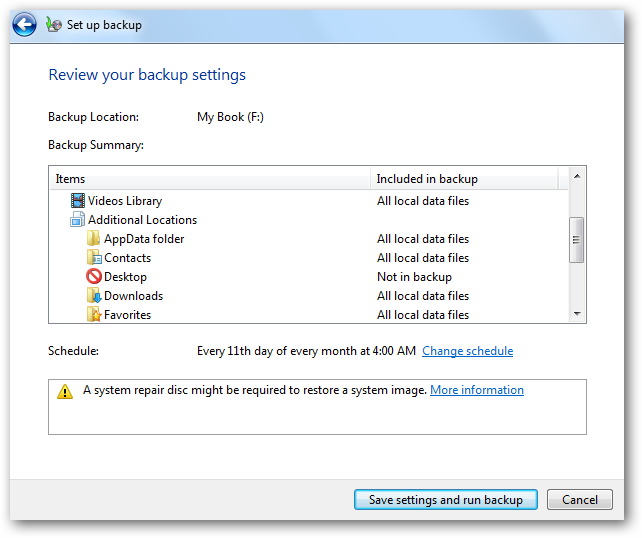
You’ll see your external drive in the list, and it should be labelled Recommended. Select it and click Next. In the next window, have Windows choose what to back up (again, it’s the Recommended setting.)
Review your backup settings in Windows 7 (Photo courtesy of howtogeek.com)
You’ll notice in the next window that Windows has set a schedule for when to back up your hard drive. Change it if you want (I’d change it to at least once a week), then click “Save settings and run backup.” Ta-da! You’ve started your first backup. Congratulations!
Mac
Macs use Time Machine. Very easy to set up, and makes it almost fun to go recover an accidentally deleted file. Here’s how to set up Time Machine:
Time Machine Preferences page (Photo courtesy of support.apple.com)
Click the Time Machine icon in the top menu bar (looks like an analog clock face), and click “Open Time Machine Preferences…)
First, hit the big switch on the left side of the window to turn Time Machine from OFF to ON. Once you plug in your external drive, you’ll click “Select Disk.” You’ll see a drop-down menu of available disks. Choose yours, click “Use disk,” and Time Machine will run your first backup in a couple minutes!
Wrapping up:
One important thing to keep in mind after you finish setting things up: Windows 8 and Mac computers will run a backup every hour when the external drive is plugged in. Windows 7 runs a backup once a month by default, and if you don’t have your drive plugged in, then you miss that month’s backup.
The easiest thing to do is just leave the hard drive plugged into your computer all the time. That’s better than having no backup! But keep in mind what I said last week about the importance of offsite backups.
I promise getting started is the hardest part! Hopefully these steps will make that process easier for you. If you felt this was helpful to you, please pass it along to someone else who might need help!
As always, if you have any questions or a topic you want help with, send it to me with the form below. I can’t wait to hear from you!
I’d known my computer longer than I’d known my wife. That MacBook and I had typed school papers and edited videos together. It stored everything from the invitation for my 14th birthday party to my wedding photos. And one day last July, it just wouldn’t turn on.
It turned out the issue was in either the power supply or the motherboard. Bad news because it meant we needed a new computer. Good news because the hard drive was unaffected. We were able to transfer everything on the hard drive to our new computer.
That’s when I realized first-hand the importance of backing up my computer. I hope you haven’t learned that lesson the hard way. If you haven’t, now’s the time.
According to one study, 1 in 20 hard drives fails within the first year-and-a-half of use. After three years, more than 1 in 10 have already failed.[1]What would you miss if you lost all the files on your computer? Don’t risk it!
If your computer is destroyed in a fire, you probably won’t be home. Offsite backups!
Offsite backups
Now that you know the importance of backing up your computer’s hard drive, here’s one more factor that’s extremely important: offsite backups. If your backups are stored on an external hard drive sitting on the same desk as your computer, it’s protecting you against hard drive failure. But if your computer is destroyed by something like a flood, fire, or tornado, that external hard drive is gone, too.
So always keep a copy of your backups in a separate location from your computer! In my case, I have one backup hard drive at home and one in my office. Every week or so I rotate them, so my offsite backup is never more than a week old. You may have another place that makes sense to store a copy (safe deposit box, relative’s house).
Today I’ll help you decide what type of backups work best for you and what hard drive and/or software you’ll need. Next week we’ll talk about how to actually put your backup plan into action!
Buying an external hard drive
The main way to backup your computer is to buy an external hard drive and plug it into your computer when you want to create a backup copy.[2] You have a copy of your files right there in your hands, but you have to remember to plug in the backup regularly and find an offsite location for it.
How much space do you need on your external hard drive? Short answer: at least as much space as your computer’s hard drive has, and preferably double it (more space never hurts).
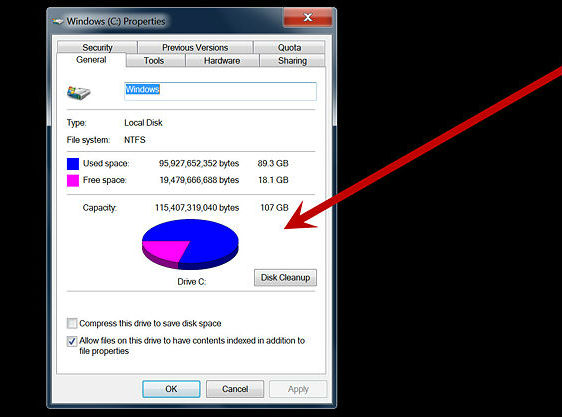
Hard drive capacity in Windows (Photo courtesy of wikiHow)
For Windows: To find your hard drive capacity in Windows 8, open File Explorer[3], right-click on “This PC” on the left side, and click “Properties.” In Windows 7, click the Start button on your desktop and click “Computer.” Right-click on “Local Disk” near the top, and click “Properties.” The Properties window will show your total capacity in gigabytes (GB), as well as how much is used.
Hard drive capacity on a Mac
On a Mac: click the Apple logo in the top-left corner of your screen, and click “About This Mac” in the drop-down menu. In the little window that pops up, click “More Info,” then click the “Storage” tab along the top of the window.
Where to buy
You can find an external hard drive at a local place like Best Buy or at an online store like Amazon. It will connect to your computer with an included USB cable. Again, you’re looking for at least double the capacity of your computer’s drive. Here’s a conversion you will probably need: 1 terabyte (TB) equals about 1,000 GB. A 1TB external drive is around $70 right now. WD, Seagate, or Toshiba are popular and comparable brands.[4]
I hope you’ve realized the importance of backing up all the valuable information you have stored on your computer. Come back next week as I show you how to actually set up your backup software (which is included with your computer). You’ll see that the backups are very easy to do once you’ve initially set up the software.
In the meantime: homework! Go get a hard drive so we can set it up next week.
As always, send me any questions you have or topics you’d like me to talk about. And click the buttons at the very bottom to share this post with someone who might need it. Thanks for reading! See you next week.
1 – Full disclosure: Backblaze, the company that authored this study, offers cloud backup plans.
2 – Another option is “cloud” backups. Two of the more popular options in cloud backups are CrashPlan and Backblaze. This site has a more detailed explanation.
3 – Open File Explorer by swiping in from the right edge of the screen, tapping Search (or if you’re using a mouse, pointing to the upper-right corner of the screen, moving the mouse pointer down, and then clicking Search), entering File Explorer in the search box, and then tapping or clicking File Explorer.
4 – If you have a Mac, you don’t necessary need a drive labelled “For Mac.” They’re typically more expensive, but are ready for your computer out-of-the-box. A non-“For Mac” drive can be quickly formatted to work on a Mac, so decide whether you want pay a little more for a drive pre-formatted for your Mac.